Archive for December 2011
Robotics December 14, 2011
Posted on: December 20, 2011
Best class ever. My Robotics dream, my ultimate goal, my vision for the future, was fulfilled. I finally got my candy. Three cheers for me.

Anyways back to the awesome world of Robotics, today’s class was a continuation of what we started in the previous class. Nabila and I headed for class early to set up. She brought our box to our table and took out the challenge program.

I, on the other hand went to the garage to get our Boe-Bot. I put the Boe-Bot on the table and looked at it closely. And so the problem began. Our Boe-Bot’s power was already at 2 which meant we didn’t turn the power off last class, and the batteries had run out. As usual, I panicked and started pacing. When Mrs. Thompson came out of her room she noticed our situation and said that we definitely needed to change the batteries.

I quickly ran to the box of rechargeable batteries and grabbed four while Nabila took out the previous batteries from our Boe-Bot. Re attaching the Boe Boost was hard because Tazeen had done it for us the last time. Of course she was happy to lend a hand again. Where would I be without Tazeen?
The class bell rang and thankfully we were not behind everyone else. Nabila took the challenge and we promptly started to work on it because we were so sure about the program we were making.
The only thing that I kind of struggled with for a few minutes was the end value for the last counter. If 122 makes the program run for 3 seconds then what makes the program run for 2 seconds. I just couldn’t figure it out. The best part was everyone I asked for the answer said they couldn’t figure it out. Which made me feel a little less dumb now that I knew the rest of the class didn’t know either. In the end Mrs. Thompson ended up telling us the end value.
Our program was almost perfect on the first try, except we forgot the second FREQOUT command that was supposed to go at the end of the program. After adding the command we quickly put it on the floor, almost failing to realize we were in danger of breaking the Boe-Bot.Yes! It worked. Mrs. Thompson came by smiled at our wonderful robot and placed a galaxy jewels in my hand. I don’t think my smile had ever been larger than it was at this point.

Later, after almost everyone had caught up, we learned the next lesson which was about Ramping. My first impression of the word made me think of ramps and I thought we were going to program the Boe-Bot to work on a tilted surface. But actually, ramping means to slowly increase or decrease the speed of the servos rather than suddenly starting or stopping. Ramping doesn’t require any extra things in your program and is only a modification to your program. The Modification looks like this:

From now on we’re going to be calling our counter, pulsecount. In this example we are trying to make the Boe-Bot move forward which mean Pin 13 has to be 850 and Pin 12 has to be 650. In order to get the 850 or 650 we add or subtract the end value of the pulsecount. For example for pin 12 if we subtract 100 which is the end value from 750 we will get 650 which will make the servo go clockwise. When we first learned this I was so lost but when we did a couple of examples in class I got the hang of it and I was even starting to help other people in our class. This is the program the class tested together:

The piezospeaker made a sound for the beginning of the program. Then the program slowly gained speed for 1.5 seconds and got to its initial speed for 75 pulses. After that the program gradually decreased the speed within 1.5 seconds and stopped. Wow, the program is way larger than the small amount of time is runs for.
The next challenge was to add ramping to our previous challenge program. struggled with it for a few minutes as everyone else did as well. I was able to figure out how to make the Boe-Bot move forward with ramping but making it move backwards seemed like a whole different story.
After a few minutes of pondering, I called Mrs. Thompson to ask her how to use ramping for the Boe-Bot if it was supposed to move backwards. Her smile was really big and all she said was “what do you think,” and she left. Although I was still struggling, Mrs. Thompson’s action made me feel good because in a way she had told me that I was capable of figuring it out on my own and very fortunately I did. It was quite simple actually.All I had to do was put the larger value first at the counter and put the smaller value as the end value. The last thing to do was to put the minus sign first then the plus sign and that was it.

Of course, we had a success. Our final Program looked like this:

In the future I think my partner and I, need to make sure we properly turn our Boe-Bot off to avoid a repetition of the low batteries and I probably will start coming to class early just in case. Also for my own learning purposes I have learned that if I’m just patient the answer might come to me rather than me always asking everyone else. As much as I enjoyed this class, the only thing I’m probably going to miss is the candy. I hope to get some more next class.
Robotics December 13, 2011
Posted on: December 20, 2011
I have to say, since the time we have started Robotics, to the time in which we are making our robot run, I think Robotics has become so much easier. Everything just magically makes sense.
The first thing that we learned about this class was Brownout. Brownout is when the supply of voltage drops below the level a device needs to function properly. As we discussed in class, when the batteries are running low our Boe-Bots will do weird things like restart the program or move in unexpected directions.
We built a circuit called a brownout detector to detect when brownout takes place. For this circuit we used a piezospeaker which was a speaker that made sounds. The sound it made would depend on the frequency it was set at. I have to say adding the piezospeaker was a bit of a challenge. It kept slipping from our hands. Once we got a grip of it, we pressed it into position and it made this large “click” sound. I was so afraid we had broken the speaker so I quickly took the speaker off the bread board to check if it was still intact. Thankfully it was. But because we had our piezospeaker still in our hands, Mrs. Thomson came by and thought we were either fooling around or struggling because the rest of the class had already attached theirs to the bread board. Since we were the last ones left, she attached our piezospeaker for us so everyone could finally be at the same place. To make this circuit we also used two jumper wires. The position of each piece was like the one shown here:

For this circuit we learned the FREQOUT command and I have to say I still struggle with the spelling. This command sends high/low signals to the speaker. This is how the command works:
FREQOUT Pin, Duration, Frequency
FREQOUT 4, 2000, 3000
In this situation the signals will be sent to pin 4 to turn on for 2 seconds (2000) at a frequency of 3 kHz (3000 hertz, which is quite high). To test the circuit we used this program:

The next thing we did was, make our Boe-Bot move. First the piezospeaker made a sound. Then servo 13 went counter clockwise and servo 12 went clockwise, making the Boe-Bot go forward. The Boe-Bot moved forward till the program got to 122 which is three seconds. We modified the program in the PDF and also added a FREQOUT at the end of the program to tell us the program had finished.

This class another important thing we learned was that to make the program run we turn the power to 1 and if we want to make the wheels run as well we turn the power to 2.
Next stop, CHALLENGE! We had the trickiest challenge in the class because ours required going forward and backward but no worries Nabila and I were confident we could pull it off. As soon as we started writing the program, “ting tong!” The bell rang. I was really getting into the class and having fun. Oh well there’s always next class. We saved our unfinished program, disconnected our Boe-Bot and put it in the garage.

Over the time of the class Mrs. Thompson asked me a few questions during class discussions and for some reason every time she asked me I could never seem to answer. I always got stuck. Robotics is a subject I like but I just can‘t seem t get comfortable with it, which is keeping me from answering questions in class. I know the answer yet, I say something else when asked. I hope this habit of mine goes away soon because every time Mrs. Thompson picks on me I look so blank that it looks like I wasn’t paying attention yet I was paying VERY close attention.
Posted on: December 12, 2011
Yes! Finally we had a class without programming. This time we only constructed so I hereby declare myself Bob the builder. Yes I know Hania the builder would sound better. One thing I’ve noticed in class is that the boys group always gets candy for finishing their task the fastest. Is it just me or are boys actually better at this kind of stuff than girls. Everyday I class I watch them chew on the candy while I think to myself, “that candy could have been mine.”

Anyways, today’s class was basically a continuation of the work we started last class. Even though there wasn’t any programming, we had certain difficulties. First we finished the task of screwing our servos onto the chassis. It’s a lot harder than it looks because screws are so tiny, and fall everywhere and that goes for the bolts as well.

After we were sure the servos were tightly on the chassis, we put a rubber lining around the hole in the middle of the chassis, which protected the wires that go to through the hole from getting cut by sharp edges.

Next we disconnected our battery pack from our board of education and took out the batteries.Then we fit the battery pack into the chassis and used two flat head screws to attach it. This was our first problem. For some reason, our screws seemed to be rather slanted instead of straight down so we thought maybe our screws were bigger than everybody else’s. Later on when we used the four head screw driver to screw in the screw, it finally laid flat.
We replaced the batteries with rechargeable batteries. Rechargeable batteries were used because…..well I actually don’t know but I remember Mrs. Thomson saying something about how harmful it was to dispose batteries. I could just see the horror in her eyes. The rechargeable batteries were a different voltage than the other batteries so we needed to use an extra rechargeable battery, which makes the grand total, five. You may be wondering that how you can use five batteries in a battery pack that only fits four batteries. Well I wondered the same thing. What we did was that we attached a boe boost, which was like a battery packs but a pack with space enough for only one battery.


The wheels were a pretty funny and frustrating part to deal with. Attaching the rubber bands onto the wheel was very painful because if you accidently let go, it snapped at you and believe me when I say that it really hurts. Attaching the wheels to the servos was quite easy. All we had to do was push the wheel on the servo like we did for the horns, and that was it. We also attached a black tail wheel on the chassis using a pin.

Finally we placed the board of education on the chassis and screwed it on tight and Walla! We were done for the day. Well almost done. Lastly we took the servo wires and placed them in pin 12 and 13 and used paper tape on the wire to label them either “R” for right and “L” for left.
Today I didn’t learn anything new but just practice how to follow instructions. Also I learned that sometimes instructions can be altered to fit your situation because everything has the same answer and just like in algebra, you can arrive at the same answer with a different method.

Robotics December 6, 2011
Robotics December 5, 2011
Posted on: December 9, 2011
Remember when I said that centering the servos was the best part; well I take that back. So far the centering has caused nothing but problems. This whole class was a big bowl of frustration, but thankfully we figured out what was wrong after a series of testing.
At the begging of class each of us got a program challenge, in which we had to program each of servos to go clockwise or counter clockwise. I was so prepared for this class that I, quickly wrote our program and ran it. Sadly class began with a bad start.

There was something wrong with our servo 12. For some odd reason it was only going clockwise in both cycles. I was almost very sure that all my durations were correct but servo 12 wasn’t running properly so there must be something wrong. I started playing around with the duration by changing them to every available number and when that didn’t, I called Mrs. Thomson for help. Turns out we were missing the two second pause in between the two cycles. Our program was perfected now, but perfecting the program didn’t solve our problem.

After a few rounds around the class, Mrs. Thomson came back to us and noticed that we still hadn’t fixed our problem. Another group had weak batteries so Mrs. Thomson suggested that maybe we were having problems with our batteries as well, so we quickly changed them. But servo 12 was still not going the right way.

Some time before class ended we finally figured out that servo 12 wasn’t going the right way because it wasn’t centered. I had noticed that the servo twitched when we last centered the servos but I didn’t think it was a big deal because it barely moved for a millisecond. Anyways, so I spent the remaining of the class trying to center the servo (it was very frustrating) and I told Nabila to listen for the next instruction because the rest of the class had already moved on.

Finally I centered the servo, and then Nabila and I had to catch up with the rest of the class. We weren’t that behind (thankfully). Now class was getting really good because we were constructing our Boe Bots. The first thing we did was, fit our two servos into each of the large holes on the chassis. We were supposed to screw on the servos with the four head screw driver and we were supposed to use four screws for each servo. We got till the 3rd screw on the first servo and then the bell rang for the end of class. Man, I was so worried that I was behind the rest of the class. But to my surprise when I came back next class, most of the people were at the same step as me, thankfully.

What I learned from my experience this class is that I should not take anything lightly. Look what happened when I took the twitching servo so lightly. I guess I’ve realized everything counts when it comes to making a robot, down to the last screw. Things will just seem to be falling apart without it.
Robotics November 28, 2011
Posted on: December 4, 2011
What we focused on this class was a worksheet. We had to state the direction of movement (clockwise or counter clockwise) and possible speed of the horns on the servos using the given pin numbers and durations. In order to fill out this worksheet there were a few key points we needed to know
- If the duration is less than 750, this will make the servo go clockwise (CW)
- If the duration is more that 750, then the servo will go counter clockwise (CCW)
- If the duration is 750, the servo will stay still. We learned this in the previous class when we were centering our servos
We used the given durations to substitute in the program we made in the previous class and wrote down the speed of the movement of the horns. For my speed descriptions, as far as I remember I used full speed, fast, slow, very slow. Mrs. Thomson was handing out prizes for those who finished the fastest. I really did want the prize but when she mentioned that this is the worksheet will guide us through the rest of robotics because we will base our duration on it. I tried going a little slower so I won’t make a mistake. I’ve learned from previous experiences that if you make one mistake and don’t fix it you’re just piling one mistake on top of another and getting no where.

This is the program we modified to fit the descriptions of the situations
DEBUG “Program Running!”
DO
PULSOUT 12, 750
PULSOUT 13, 750
PAUSE 20
LOOP
There was one cool thing in this class and it was weird to believe but there was logic behind it. We made our servos turn different way. One went clockwise and the other went counter clockwise and Mrs. Thomson said “and this is the way you’re going to make your Boe-Bot run in the same direction.”Now that was very weird. How can two horns running in different directions possibly run forward or backward together? Once she showed us how, I felt so dumb inside because I did not realize soon that the servos will be facing outward and away from each other and if you hold them the correct way you can see they will make the Boe-Bot run the same way.

Later on, we looked into our past studies and brought back the wonderful counter variable.We used this to stop the servo form running without turning the power off.
Hania VAR Byte
FOR Hania = 1 TO 100
PULSOUT 13, 850
PAUSE 20
NEXT
As simple as this program looks its actually very complex. There’s a a lot of math that goes with it. How do you figure out for how long this program will run. You add the clockwise PULSOUT and the counter clockwise PULSOUT and which are 1.3 and 1.7. Then you add the pause which in this case is 20. So in the end we get 23. The next thing is to multiply this by 100 because that is the number that it will run till in the counter and we will get 23 seconds
In order to make the servos run at the same time but for different durations we added a couple of tings to the previous program. After we added this to the program the servo connected to p12 ran twice as long as the one connected to p13. Right after the Next in the previous program we added this:
FOR Hania = 1 TO 200
PULSOUT 12, 850
PAUSE 20
NEXT
END
After that Mrs. Thomson gave us those hands on challenges that described a situation and we had to modify our program accordingly. Sadly I don’t remember what my program was but I know that I sat in my seat even though the bell had rung because I couldn’t figure out whether I was supposed to change the pause or not. The worst part is that I figured it out with the help of Mrs. Thomson but since the bell had already rung I had to hastily rush through the knowledge and so I didn’t have time to grasp the concept so I don’t remember what the answer was. But as always I’ll be sure to ask. Again like my previous goal I think I should start asking more questions. It’s the only way I’m going to understand anything and this time I’ll try to ask during class not five minutes after class ends.
Robotics November 27, 2011
Posted on: December 4, 2011
The main thing we did for this class was center the servos which are the motors that will control the motion for the Boe-Bot. In order to center the servos we needed to learn the PULSOUT command which requires a pin number and a duration and it looks like this
PULSOUT pin, duration
The pin number is the pin you want to send the signal and the duration is a little more complex than that. If the duration is 2 that mean the number of microseconds it will run for is 4. This is because you multiply the duration by two. Why do we multiply by 2 you may ask? Well because 1 = 2 microseconds.
We had to resisters and two LEDs on the bread board and we wrote this program. This program sends a signal to pin 13 and 12 to send a 0.13 second pulse. How did I arrive at the number 0.13 when the duration says 65000? Since 1=2 microseconds we multiply 65000 by 2 and then we divide by a million and arrive at 0.13 seconds. Then the LEDs will pause for 2000 which is 2 seconds. The DO…LOOP commands in the program will just make the program run again and again
‘ Robotics with the Boe-Bot – PulseBothLeds.bs2
‘ Send a 0.13 second pulse to P13 and P12 every 2 seconds.
‘ {$STAMP BS2}
‘ {$PBASIC 2.5}
DEBUG “Program Running!”
DO
PULSOUT 13, 65000
PULSOUT 12, 65000
PAUSE 2000
LOOP
Afterwards we divided all the numbers by 10 in order to make the program run 10 times faster and then we moved on to make it a 100 times faster. Instead of turning off and on the LEDs just appeared less bright because then they were turning of and on so fast. After that we substituted 850 for the duration of p13 noticed that the O13 LED appeared brighter than P12 when we cupped our hands around them.
Later we moved on to using the servos which are the motors that control the motion of the Boe-Bot. We connected the servos to a power supply on the Basic. There was a little black box like thing in the middle of the board of education and it was closer to vin but it was supposed to be closer to vdd so Mrs. Thomson carefully moved it with a her skinny tool. Honestly I don’t know why we had to move but I’ll be sure to ask later. For now I think it was because our power supply was from batteries not an adapter.
Now I was time to connect the servos to the board of education. We put one servo in p12 and one in p13. The plugs looked so fragile I thought my big fingers would break them so I watched while Nabila connected them. On our servos we put on horns which were a testing replacement for the wheels.

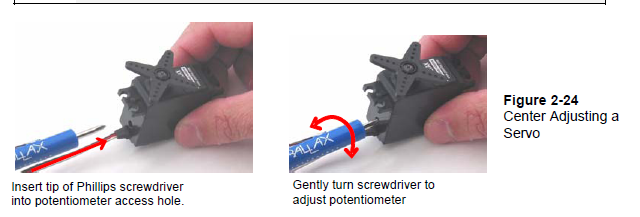
Next, was the fun part. I have to say that centering the servos was the most fun I’ve had in all of the robotics classes. It seemed so scary when Mrs. Thomson mentioned that when Musad forgot to center his servos he had to take apart his whole Boe-Bot to fix his mistake. But in real it was quite fun. Why would anyone want to forget such an amazing step? In order to center our servos first we needed to write a program.First we wrote it for p12 and then modified it to be for p13.
‘ Robotics with the Boe-Bot – CenterServoP12.bs2
‘ This program sends 1.5 ms pulses to the servo connected to
‘ P12 for manual centering.
‘ {$STAMP BS2}
‘ {$PBASIC 2.5}
DEBUG “Program Running!”
DO
PULSOUT 12, 750
PAUSE 20
LOOP
In order to center our servos we put the four head servo into a whole in our servo and we kept spinning it around. While we were doing so the horn were moving and our goal by spinning the screw driver was to stop them from spinning so we went in multiple direction to fulfill our job.
I hope all the classes in robotics are like the one I just had. I think what I need to work on in robotics is to ask more questions. If I asked more questions I would know what everything was called and I wouldn’t forget when I got home because I would understand the concept.

